Whole-Body Training: Warding Patterns
Reinforce how the body’s various systems “share responsibility” for producing stable motion with maximal efficiency.
Observing sport is a great way to appreciate human structure and function. High-level athletes teach us a lot about optimal performance—and even dysfunction. Watching skilled athletic movement at the collegiate or professional level stimulates us to ask questions and scrutinize our existing training methods. This article identifies a need to introduce warding patterns as part of a well-balanced training and conditioning program. Practicing warding patterns elicits adaptations that are authentic to our physiology and can transfer to sports and daily activities.
What Is a Warding Pattern?
When used as a verb, to ward means “to guard, protect, put off or create space.”
In the classical sense, we use the term warding in sports to describe actions like using a “stiff arm” in football or “posting up” in basketball. In each of these warding patterns, the athlete simultaneously creates stability and mobility. In the football and basketball photographs shown here, consider who might have the advantage if one of the athletes stopped moving. In both instances, the athlete who was left “flat-footed” would lose the battle.
Coaches often tell athletes, “Keep your feet churning,” or “Move your feet.” These instructions require athletes to move and to be stable simultaneously. This goes against conventional wisdom, which says that either we maintain stability (stillness) or we’re in motion (mobility)—two mutually exclusive concepts. However, the nature of our structure is to have both happening at the same time.
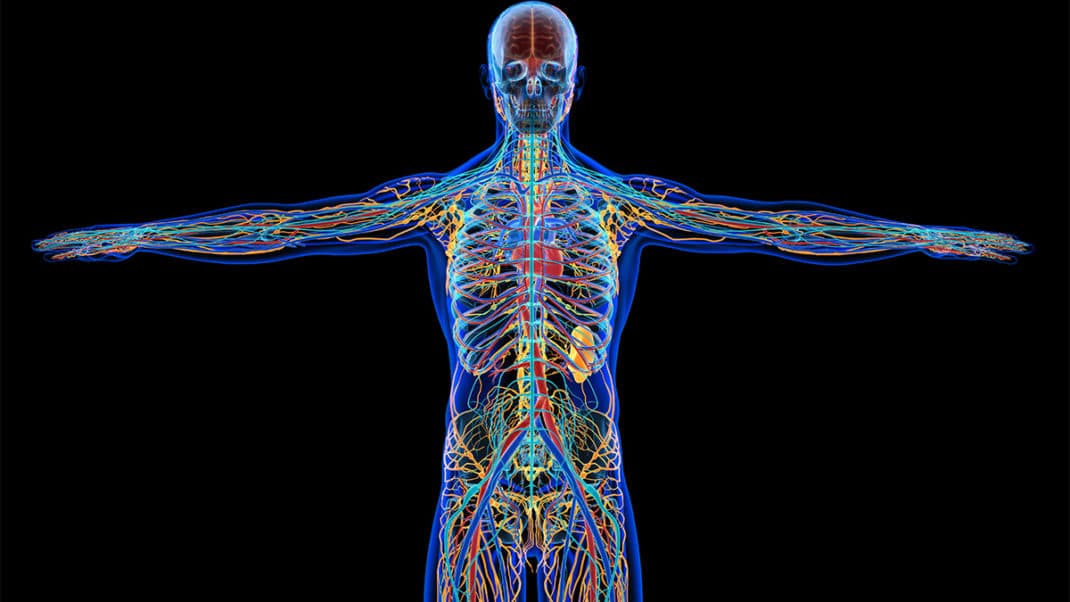
 If we analyze muscle on its own, we may find this hard to explain. A muscle is either “on” or “off.” If a muscle is on we are stable, and if it is off we are unstable. In reality, however, the body’s structures have a shared responsibility for producing motion and stability; therefore, we must study and appreciate our body as an aggregate. The body’s systems (muscle, fascia, nerves, skin—to name just a few) have an incredible ability to work together to move our bodies. If we try to rely solely on one or other of those systems, then our biology will fail us (Gracovetsky 1988); use them together, and we become greater than the sum of our parts (McGill 2004).
From a mechanical perspective, warding patterns can be defined as “the physiological state of maintaining optimal body-wide tension against an external force while producing gross movement patterns” (Institute of Motion 2010). With human function, optimal body-wide tension needs to be sensitive to and stimulated by changes in magnitude, angle and rate of loading (Huijing 2007). Thus, we must consider timing, vector variability and load when programming warding patterns for clients and athletes.
More Than Muscle
Stiffness and stability have often been studied, viewed and trained with a muscle-centric focus on the abdominal wall. Consider our changing perspectives on abdominal architecture from the early 1990s to the present and the ways that we have trained this area (Figure 3). It’s clear that a more holistic viewpoint is emerging. This is not to suggest that exercises should be discarded as our perspective changes. As our toolbox builds over time, we can pick and choose the most appropriate training applications to meet specific needs.
We must also develop a strong understanding of what is at the heart of our biology—namely, a shared responsibility among all tissues to create a viable environment for movement. Mobility, stability, strength, endurance and timing exist interdependently. With regard to motion and stability, this is more aptly understood when we consider more than just muscle. Warding patterns stimulate and coordinate bodily systems so that we can authentically create training stressors that have integrated adaptations.
Let’s take a closer look at what warding patterns introduce to our training.
Timing Is Paramount
Timing is simply how the body coordinates itself through the aggregate of its structures to optimize an intended action. Consider electromyography (EMG) studies on sprint starts, golf swings and many other actions—these activities all have a rhythmical outcome that is predicated on timing (for example, a muscle turning on and off when needed). As McGill (2004) suggests, “Rapid limb motion requires rapid transitioning between compliant muscle for speed but very active and stiff muscle for force and joint torque production.”
It may be more important for a muscle to turn off than to turn on. In the case of sprinters, muscles polarize and depolarize at an astonishing rate. At the sound of the gun, muscles transition from relaxation to peak contraction incredibly quickly and they deactivate equally quickly (McGill 2004). A throwing motion is no different. Escamilla & Andrews (2009) demonstrated that muscles have different firing intensities through different phases of a baseball throw.
It is important to remember that so far we have talked only about the neuromuscular system. The fascial system’s afferent ubiquity and its role in coordination and support must also be taken into consideration. Fascia’s structural tension (due to its collagenous substance, which exhibits a high level of tissue stiffness) aids body-wide pre-stress, a biomechanical term that refers to “the internal tension of a system prior to the application of external load” (Ingber 1998, 2008). Fascial loading is rate sensitive. Slow, sustained fascial loading (i.e., holding postures) impacts plastic deformation (more lasting change), whereas quick, explosive loading yields an elastic (more temporary) response (Siff 2003).
Take special note that for the warding patterns demonstrated in this article, the maximum loading period is 10 seconds and the period can be as short as a fraction of a second. These loading rates are consistent with performance adaptation in the fascial structures. General fitness programs far too often focus on muscle activation and not on relaxation. Warding patterns impose both a stiffness (activation) phase and a relaxation (deactivation) phase in each drill. The body flows from stiffness to relaxation along lines of pull in a rhythmical way.
To improve sensitivity to up and down regulation, pay close attention to the timing of warding patterns and how they train the nerves, muscles and fascia.
Why Vector Variability?
“We don’t regenerate; we remodel.” It was in a conversation with Tom Myers, and also while reviewing the research of Peter Huijing (2007), that I first understood vector variability in this way. In essence, vector variability is triangulation of load in order to create differing and changing lines of pull. Note that muscle stabilizers continually change as the task changes (McGill 2004), which reinforces the notion that muscles are task-driven (Zajac & Gordon 1989) and sensitive to changing lines of pull. Warding patterns are designed to be triangulated in order to change the force the body receives so that the tissue response is vast and varied.
Remember: A vector is a force with magnitude and direction, and having variability simply means being subject to change. Davis’s law describes how soft tissue models itself along lines of stress (Wolff’s law would describe a similar effect in bone). Fascia remodels itself in response to usage patterns, gravity and other impact forces (Huijing 2007; Grinnell & Petroll 2010). If a client is introduced to a wide range of lines of pull, fascia/soft tissue will remodel itself in a ubiquitous way, making the structure stronger through enhanced pre-stress. The internal tension of pre-stress explains why biological structures have shape stability (Ingber 2008).
A pre-stressed structure has increased stability and integrity at minimal metabolic cost (Ingber 1998). Therefore, it behooves us to introduce training that will maximize this effect. The warding patterns introduced here are whole-body movements and are performed in an upright stance. This creates longitudinal lines of pull that remodel tissue and maximize internal body tension.
Loading Warding Patterns
Ascending and descending reactions are relative to anatomical neutral and relate to force that enters our bodies toward the lumbo-pelvic-hip complex (LPHC) from the legs (ascending) and toward the LPHC from the arms (descending) (Gray 2003). The core, or LPHC, facilitates the convergence of these reactions and must coordinate the mechanical reactions if optimal performance is to occur. When there is a synergy between muscles, there is a measurable increase in efficiency and economy of motion (Andrews 1985, 1987). The warding patterns in this article are integrated from top-down and bottom-up to train the neuromyofascial web (Myers 2004) as a complete system.
Warding Pattern Drills
Warding patterns are categorized into three thresholds. Each threshold has six guidelines for proper regression and progression. Threshold one is beginner level, threshold two is intermediate, and threshold three is advanced.
These six guidelines govern all drills:
1. Orientation: where the athlete/client is in a field of gravity. For instance, standing, seated, kneeling, side-lying, etc., are all different orientations to gravity, and each one challenges the body differently. Gravity and ground reaction forces are constant; however, our interaction with them dictates adaptation.
2. Action: what gross movement pattern the individual is performing (if any). There are three broad choices:
- stationary force (push, pull, rotate)
- level change (squat, lunge, bend, vertical jump or hop)
- locomotion (walk, run, shuffle, skip, jump, hop, carioca, etc.)
3. Device: the tool chosen to load the movement. Examples include barbells, dumbbells, kettlebells, sandbells, sandbags, Bulgarian bag, ViPR™, cable, bungee, chains, weight vest, sled, body weight, another person and many more.
4. Footprint: where the feet are positioned and where they are moving. For example, a client can place his feet shoulder width apart, staggered, balanced on one leg, etc. Foot position and movement are important because they influence all ascending reactions.
5. Handprint: where the hands are positioned and where they are moving. For example, a client can place her hands at chest height, waist height or overhead. She can push or pull bilaterally, unilaterally or in a reciprocating manner. Moving the hands in different directions stimulates varied lines of pull, which benefits human tissue. Handprint is important because it influences all descending reactions affecting the body.
6. Threshold: acute variable manipulation. This is a personal trainer’s last check and balance to make sure drills are programmed appropriately for each individual. Acute variables include volume, tempo, load, speed, range of motion (ROM), complexity of motion, base of support, surface and many more. Essentially, threshold includes all the variables you can manipulate.
It is extremely important to program proper training stress application so that the individual limits his or her risk for injury while maximizing structural adaptations.
Threshold One: Beginner
Threshold one introduces a low-level neural, mechanical and metabolic challenge. It is extremely important that the individual begin to acquire neural sensitivity (on and off muscle action) with low movement complexity and at little metabolic cost. Low neural and mechanical challenge imposes a tolerable stress as one begins warding patterns.
Here are threshold one guidelines, followed by two sample drills:
Orientation
- on the ground (prone, supine, side-lying)
- kneeling
- half-kneeling
- standing
- on the gym floor surface, turf, grass
Action
- stationary force production
- level change (initial ROM)
Devices
- stationary anchor (wall, stationary partner, door frame, equipment frame)
Footprint
- static
Handprint
- static
Acute Variable Manipulation
- wide base of support
- low force
- varying angles (vector variability)
- known response (static anchor)
- no reactivity
Threshold One Warding Pattern 1


Prerequisite.If a client exhibits upper and lower crossed syndrome, initiate a corrective strategy prior to performing this drill.
Preparation. Choose an anchor on which you can ward down and up. Using a partner may not necessarily be the best option. Equipment and door frames are suitable anchors.
Movement
- Stand tall with the feet shoulder width apart.
- Raise one arm to shoulder height, and place the hand on the anchor (as shown).
- Push medially at shoulder height and hold for 2 seconds.
- Release, and repeat the sequence with the opposite hand.
- Descend into a squat and perform the pattern again while maintaining a level change.
- Perform a second descent into the squat if desired.
- Repeat the entire sequence as you stand back up.
Benefits of This Drill
- It engages the body’s stability mechanism and teaches sensitivity to up and down regulation.
- It is a great way to introduce vertical core training.
Regression
- Perform without the squat.
Progression
- Assume a staggered stance.
Threshold One Warding Pattern 2


Prerequisites. Ensure that the client exhibits good posture and alignment through the kinetic chain and has been exposed to exercise #1 above.
Preparation
- Choose a suitably strong partner to push (ward) against you.
Movement
- Stand tall with the feet shoulder width apart. Your partner will raise one hand to your shoulder, push for 2 seconds and repeat the push on the opposite side.
- Hold strong and stable, resisting the two pushes and relaxing between them.
- Once one push on each side is complete, descend into a squat and let the cycle repeat.
- Perform the desired cycles, depending on the goal.
Benefits of This Drill
- This progression of the first drill relies on more sensitivity through the nervous system and a higher degree of feedback through the proprioceptors to create stability and to avoid critical delays. This drill has a high degree of transfer to sports and activities of daily living (ADL).
Regression
- Perform without the squat.
Progression
- Perform with a staggered stance.
Threshold Two: Intermediate
Threshold two builds on the complexity of motion, timing, leverage and neural/mechanical/metabolic demand. Here we introduce locomotor patterns; various loading devices to stress the tissues differently; and dynamic footprint variability to upregulate neural challenge while also testing overall body stability and timing.
Here are threshold two guidelines with two drills:
Orientation
- on the ground (prone, supine, side-lying)
- kneeling
- half-kneeling
- standing
- on the gym floor surface, turf, grass, dirt, sand
Action
- stationary force production
- level change (initial: mid ROM)
- locomotion
Devices
- stationary anchor with variable anchor points (wall, stationary partner, door frame, equipment frame)
- cable (isotonic resistance) with variable anchor points
Footprint
- dynamic footprint variability
- locomotion (three-dimensional)
Handprint
- static variability
Acute Variable Manipulation
- varying base of support
- medium force
- varying angles (vector variability)
- mostly known movement (moderate reactivity)
- medium movement speed
- simple to moderate movement complexity
- small to moderate ROM
Threshold Two Warding Pattern 1


Prerequisites. Ensure that the subject has adequate thoracic spinal mobility and good extension through the hip complex.
Preparation. Predetermine the ROM of the foot’s reach and remain consistent throughout the exercise.
Movement
- Begin with both hands extended from the chest.
- Apply pressure (in the transverse plane) against the anchor.
- While holding transverse pressure, perform repeated alternating posterior foot reaches.
- Perform this drill for no more than 10 seconds. Rest for 20 seconds and switch sides.
Benefits of This Drill
- It challenges core timing.
- It improves transverse plane stability.
Regressions
- Take smaller steps.
- Keep hands closer to the body.
Progressions
- Perform posterior lunges.
- Hold hands at head height instead of at shoulder height.
Prerequisites. Ensure that the client exhibits adequate ROM in the hip complex and thoracic spine before attempting this drill.
Preparation. Predetermine the ROM of the foot’s reach and remain consistent throughout the exercise.
Movement
- Begin with a broad footprint.
- Choose a partner of similar size and strength to you. The push hand is opposite the forward foot.
- With the elbow at chest height, perform a push pattern against your partner as he resists.
- Once fully extended, resist your partner as he pushes against you.
- Perform this drill rhythmically for a maximum of 10 seconds. Rest for 20 seconds and switch sides.
Benefits of This Drill
- It improves the mobile stability of the kinetic chain.
- It teaches reactive stability.
Regressions
- Slow the tempo while maintaining rhythm
- Reduce the push’s ROM.
Progressions
- Speed up the tempo.
- Increase the push’s ROM.
Threshold Two Warding Pattern 2


Threshold Three: Advanced
Threshold three maximizes training stimulus and authenticates transfer of skills to sport and/or life. At this level, movements and ROM mimic the speed and load that the individual will be exposed to in her environment or sport. Threshold three uses rapid, rhythmical loading rates to maximize viscoelastic tissue response (Kubo et al. 2006). This threshold also builds quick, rapid loading patterns that stimulate rapid onset and muscle relaxation. Neural, mechanical and metabolic demand is high and complex. The locomotor patterns mimic movements in the client’s activity.
Here are threshold three guidelines with two drills:
Orientation
- on the ground (prone, supine, side-lying)
- kneeling
- half-kneeling
- sitting
- standing
- on both indoor and outdoor surfaces (including ice)
Action
- high force production with varying footprint patterns
- level change (end ROM)
- locomotion (at high tempo)
- intermittent warding (moving to or away from the ward)
Devices
- dynamic anchor with varying anchor points (sled, partner—stationary or moving cable, isotonic resistance, bungee, variable resistance, door frame, equipment frame)
- speed ladder, cones, hurdles
- dowel rod, hockey stick as warding implement
- slant boards
Footprint
- highly dynamic variability
- locomotion (three-dimensional)
Handprint
- dynamic handprint variability (three-dimensional)
Acute Variable Manipulation
- varying base of support
- high force
- varying angles (vector variability)
- known and unknown movement (high reactivity)
- high movement speed
- high movement complexity
- End ROM. Caution: Have the client move only through the ROM that will be used during his or her activity or sport. Be careful not to stretch away essential passive tension.
- high reactivity
- head shake/one eye closed
Threshold Three Warding Pattern 1


Prerequisite.It is essential that the client demonstrate three-dimensional hip mobility before progressing to this level.
Preparation
- Maintain length in the spine throughout the drill.
- Initiate movement from the hips.
- Ensure that you have a strong anchor for this drill (machine frame, door, stable partner, etc.)
Movement
- Begin with your back to the anchor.
- Perform a transverse plane lunge and hold.
- Place your hands on the anchor as shown.
- Apply a maximal push into the anchor and hold for 2 seconds.
- Return to start position and repeat.
Benefits of This Drill
- It encourages end-range stability and strength.
- It improves dynamic stability and full-body timing.
Regressions
- Do a frontal-plane lunge.
- Apply less pressure on the push, and hold for only 1 second.
Progressions
- Add a retro shuffle to transverse lunge.
- Extend the lunge ROM and reach (only where appropriate).
Threshold Three Warding Pattern 2


Prerequisite. Ensure that the client does not exhibit upper crossed syndrome (increased kyphosis).
Preparation
- Grip the bungee and extend both hands overhead.
- Maintain length in the spine.
Movement
- Perform a self-selected number of carioca steps away from the bungee anchor.
- Slowly and rhythmically return to the start position.
Benefits of This Drill
- It loads the lateral myofascial line.
- It improves stability and strength in the frontal plane.
Regressions
- Draw the hands closer to the body.
- Reduce the distance traveled.
Progressions
- Perform with a carioca shuffle at high speed.
- Extend the hands higher overhead.
Conclusion
Warding pattern drills reinforce the notion that the body is an interdependent structure that adapts to constantly changing forces. By integrating proper progression schemes, clients will reach their fullest functional expression. Try these drills in your own program design and introduce regressions to clients first. Many clients will progress and adapt quickly and will find that their strength and stability noticeably improve.
For more examples of warding patterns, please visit www.instituteofmotion.com.
Warding patterns aren’t just for athletes. Here’s how this form of training affects activities of daily living for any clients:
1. Running. In order to thrive as a runner, you must be able to deal with gravity and ground reaction forces. Many runners succumb to pronation distortion patterns and related injuries. The ability to decelerate pronation is a body-wide phenomenon, and warding patterns help develop the requisite strength and stability a runner needs.
2. Recreational sports. Those who lead a largely inactive life and play sports intermittently (your typical weekend warrior) often do so with nagging aches and pains. Warding patterns will positively affect the connective tissue and make it resilient and reactive.
3. Interactions with kids.Some parents develop low-back pain from lifting and shifting their small children. The pain has several common causes, which include poor hip flexibility and/or poor lumbar-spine stability. Warding patterns re-establish movements that mitigate stress from the spine. They also promote structural adaptations that strengthen the core, making it strong and reactive.
When you use the warding pattern drills in this article with your clients, biomechanical efficiency must be present. To avoid improper mechanics and reduce joint stress, follow these three simple cues:
1. Initiate from the hips. It is extremely important that the lumbar spine moves with an associated motion from the pelvis. With efficient mechanics, the pelvis will move and the lumbar spine should follow with a chain reaction to mitigate stress. Initiate each warding pattern from the hip complex to ensure that stress is attenuated away from the spine and toward the extremities.
2. Maintain length in the spine. Create length in the spine; this will take pressure off the intervertebral disks and create space for the spine to move. Proper mechanics necessitate the spine’s ability to move; however, in relative terms the spine is not designed to move a whole lot. Maintaining length in the spine and initiating movement from the hips will create a safe environment for the spine to thrive.
3. Reach with the scapula. In keeping with the theme of creating space for joints to move, reach with the scapula. Limiting scapular motion may seem innocuous; however, it approximates the acromioclavicular and sternoclavicular joints and can create biomechanical risks as well as compromise joint dynamics. Reach with the scapula when an arm motion is part of a drill.
Source: Adapted from conversations with Chuck Wolf, MS, applied biomechanics specialist and director of Human Motion Associates in Orlando, Florida.
References

Michol Dalcourt
Michol Dalcourt is an educator, author, trainer, inventor and an industry leader in the areas of human movement and performance training. He is a director for the Institute of Motion, adjunct professor at the University of San Francisco in sports science and co-founder of PTA Global certification. Michol is also the inventor of ViPR™, a fitness tool being rolled out in top clubs and with professional athletic teams. His innovative techniques have been adopted by many of the top international fitness certification bodies.