The 3D Booty: Training the Glutes for Form and Function
Booties, butts, glutes and rumps. Our fascination with enhancing our posterior spans the training spectrum, from the aesthetic-focused client to the performance-driven athlete. Yes, we want our backsides to look better, but we also need them to function more effectively, judging from the increasing number of knee and low-back injuries (Hoy et al. 2012).
Our current approach to the lumbo-pelvic-hip complex—emphasizing concentric muscle activation and linear movement patterns—provides an incomplete picture of how the hip joint and surrounding myofascia receive and transmit a variety of forces. This article will explore some unique kinesiological and biomechanical principles to widen our perspective on how the glutes function in many of our favorite exercises. After that, you’ll find exercise strategies to give your clients the butts they’ve always wanted and the hip function they require to move optimally.
The Need to Move Multidirectionally
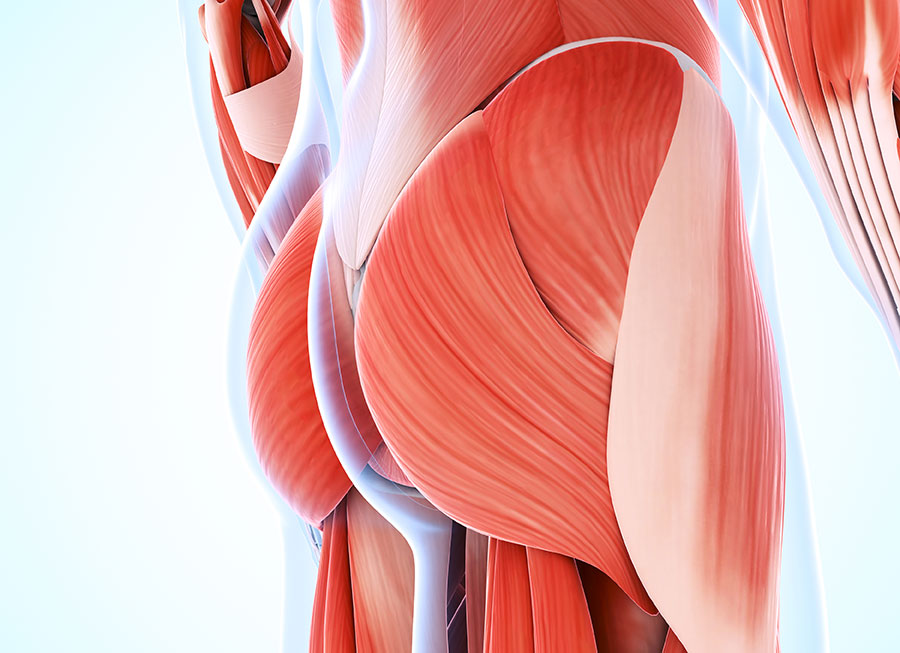
As we peel back the layers of the buttocks, we find an abundance of myofascia running multidirectionally around the pelvis, sacrum and femur, allowing the hip to be one of the body’s most stable and mobile joints. The short distances between the origin and insertion points of the various gluteal and hip-rotator muscles also provide good leverage and power for hip propulsion and stabilization. The multidirectional orientation of these muscles allows us to absorb and transmit force in a variety of directions, but only if we train the body accordingly.
Traditional squats, lunges and dead-lifts transmit a predominantly large and unidirectional force, typically in the sagittal plane through the hip-glute complex, allowing us to greatly load the body in that direction. The toning and hypertrophy benefits gained here, however, may come at a cost to the surrounding connective tissue as it becomes less resilient at handling multidirectional force (Price 2012).
Luckily, there is more than one way to promote hypertrophy of a muscle. It’s been shown that multiplanar movements recruit more muscle fibers to be stimulated for mechanical stress at intensities as low as 30% of a one-repetition maximum, so long as the movement is done to failure (Burd 2012; Schoenfeld 2010).
Promoting multidirectional movements in our squat-and lunge-type patterns can
- stimulate more glute fibers to be exposed to mechanical stress (think muscle tone);
- promote connective-tissue tolerance of multidirectional movement;
- enhance the nervous system’s responsiveness to multidirectional movement;
- maintain or even improve the integrity of the hip, knee and spine; and
- progressively add more intensity and volume (mechanical stress) to multidirectional movements for hypertrophic gains.
Back to Kinesiology School
Conventionally, we think the glutes’ primary function is to create hip extension, external rotation and abduction. As a result, we select popular exercises such as floor bridges and hip thrusts, side-lying clams, prone leg raises and cable hip extensions because of their high muscle-activation potential during these motions. While this conventional approach is still warranted, it considers only how the glutes and hips function in the presence of gravity, with femur-on-pelvis motion in a horizontal position relative to gravity.
When we expose the upright body to the forces of gravity and ground reaction, and then couple them with pelvis-on-femur motion, we find the glutes will actually turn “on” during their eccentric phase and, relatively speaking, turn “off” during the concentric phase, using the concept of “load to unload” (Lorenz 2011; Komi 2000). For example, the glutes will turn on during the deceleration of an anterior walking lunge but turn off as we stand up and propel ourselves forward onto the other leg.
Coupling eccentric muscle contraction with loading/lengthening of the fascial web helps us maximize our energy potential, following the principle of energy conservation (Komi 2000). Thus, the glute complex receives the energy of gravity and ground reaction as the hip moves into flexion, relative internal rotation and relative adduction—motions opposite to those we usually associate with glute activation (Wolf 2011). The interplay of the neuromyofascial systems and their timing in promoting optimal hip, knee and lumbar motion are vital for maintaining the integrity of our joints and for enhancing performance (IOM 2012).
This perspective increases our understanding of why squats, deadlifts and lunges are great glute exercises, and it provides a path to helping clients improve the appearance of their butts. How so? Well, performing these exercises multidirectionally allows us to truly take advantage of the glutes’ responsibility to stabilize and create multiplanar motion at the hip, while also sending more mechanical stress into the gluteal complex.
Table 1. Conventional vs. Progressive Approach to Glute Function
| Perspective | Conventional | Progressive |
|---|---|---|
| focus point | muscles | muscles, connective tissue, nervous system and joint motion |
| activation | concentric | eccentric and isometric |
| force profile | gravity | gravity plus ground-reaction force |
| hip motion | femur on pelvis | pelvis on femur |
| muscle actions | accelerates hip extension, abduction, external rotation | decelerates hip flexion, relative adduction and relative internal rotation |
| position and direction | horizontal and sagittal | vertical and multidimensional |
Level-Based Approach to Progressive Glute Training
The following exercises may be new for you or your clients, so it is imperative to build a foundation for good movement and slowly progress the level of force the body (and specifically the glutes) can tolerate. If you can move a lot of weight with traditional squats, lunges and deadlifts, it’s still important to begin by practicing these new movements unloaded, with small ranges of motion and at speeds that promote rhythmic movement.
As we build a tolerance to novel movements, we can progress to greater mass, bigger ranges of motion and faster speeds. You may be surprised at how sore the hips can become after these exercises, so avoid the mantra that “more is better” and follow this continuum to success.
Table 2. Threshold Training
| Threshold 1 | Threshold 2 | Threshold 3 | |
|---|---|---|---|
| Force | low | medium | high |
| Range of motion | small | small-moderate | large |
| Speed of motion | slow | medium | fast |
| Neural complexity | simple | simple-moderate | complex |
| Metabolic demand | low | medium | high |
Source: Adapted from Institute of Motion 2012
Threshold 1 Exercise
Level 1 exercises begin with a known movement but may provide a new direction of stress into the body. They typically start with a stationary footprint and can help teach the rhythm that ensures the feet, ankles, knees and hips share the responsibility of a given movement pattern. Movement must be pain-free and initially should be kept to small ranges of motion and slow speeds. As a client improves, these exercises can evolve into a great warm-up for Threshold 2 and Threshold 3 exercises.
Staggered-Stance Squat With Lateral Arm Reach
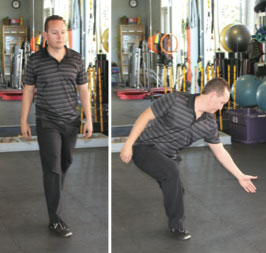
| Exercise Instructions | |
|---|---|
| Setup | Begin in split stance, right leg forward and foot flat. Left leg is back and on toes. Arms are at sides. |
| Execution | Drive body down and forward so majority of weight is on front foot. Simultaneously, drive left hand laterally and toward ground while hips move in opposite direction. Stand back up and repeat for desired reps before switching to other side. |
| Tips |
|
| Progressions |
|
| Benefits |
|
ViPR® Stir The Pot
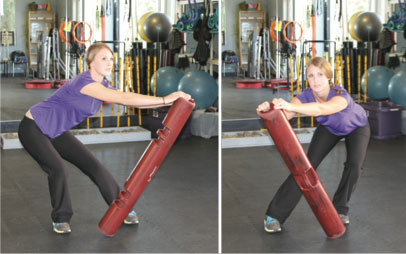
| Exercise Instructions | |
|---|---|
| Setup | Place light- to medium-sized ViPR on end in front of feet. Stand hip-width apart. |
| Execution | Begin by tilting ViPR with hands forward and to left (toward 10:30 on clock face). At same time, hips should be flexing and moving in opposite direction to hands (toward 4:30). Tilt ViPR in circular pattern while driving hips in circular pattern before standing up and repeating in other direction. |
| Tips |
|
| Progressions |
|
| Benefits |
|
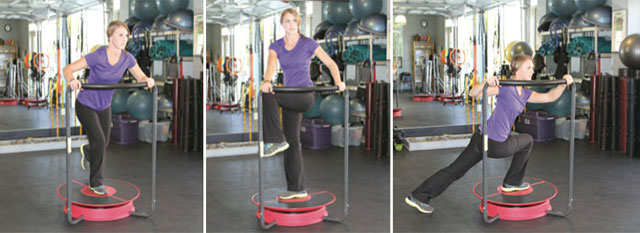
Power Plate® Wide-Stance Lateral Squat
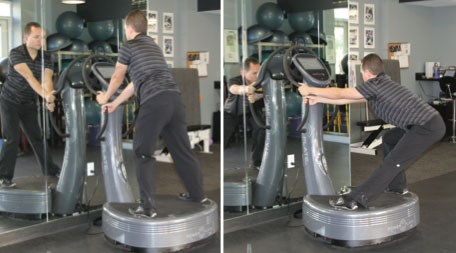
| Exercise Instructions | |
|---|---|
| Setup | Set Power Plate to Level 1 (30 Hertz/low) for beginners, Level 3 (30 Hz/ high) for intermediate, Level 6 (40 Hz/high) for advanced; set timer to 60 seconds. Place feet on opposite sides of plate. Hold left handrails. |
| Execution | Shift hips over right foot while holding handrails. Be sure to sit back into hips and keep spine tall. Stand up and repeat for 30 seconds before switching sides. |
| Tips |
|
| Progressions |
|
| Benefits |
|
Threshold 2 Exercises
Level 2 exercises are typically loaded and can add complexity to a movement pattern. They require the body to move at various heights, distances and speeds and in various directions. The exercises require greater tissue and neural tolerance than Level 1 moves and are best used as progressions of Level 1 exercises.
Core-Tex™ Curtsy Lunge
| Exercise Instructions | |
|---|---|
| Setup | Holding handrail with both hands, place right foot on center of Core-Tex. Other foot will be floating. |
| Execution | Begin by driving left knee up and to right, causing Core-Tex to spin to right (foot pointed to 3 o’clock). Next, take left foot around Core-Tex and place it on floor at 3 o’clock, causing right foot to spin and point toward 9 o’clock. Stand up and repeat action for desired reps before switching sides. |
| Tips |
|
| Progressions |
|
| Benefits |
|
TRX® Suspension Trainer™ Single-Leg Squat With Rotation
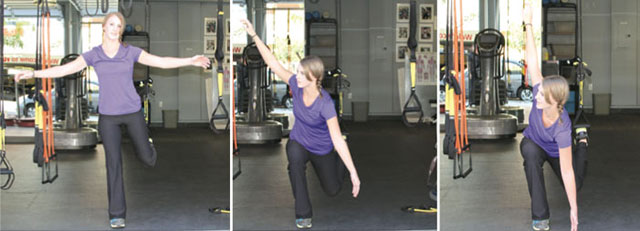
| Exercise Instructions | |
|---|---|
| Setup | With TRX in long position, place left foot in foot cradles and right foot on ground. |
| Execution | Squat on right foot while driving left hand toward right foot and right hand to right and overhead. Stand up and repeat for desired reps before switching. |
| Tips |
|
| Progressions |
|
| Benefits |
|
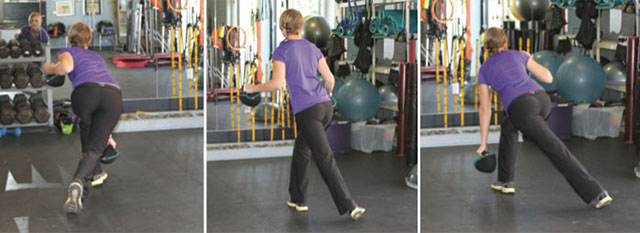
ViPR Single-Leg Deadlift With Cross-Over Reach
| Exercise Instructions | |
|---|---|
| Setup | Balance on right leg. Hold ViPR with left hand in shovel grip. Keep right knee soft. |
| Execution | Hinge on right hip, driving left leg back. Drive ViPR across body so thumb points at right heel and ViPR lines up parallel to right foot. Left leg will move in opposite direction, creating right hip flexion and internal rotation. |
| Tips |
|
| Progressions |
|
| Benefits |
|
Threshold 3 Exercises
Level 3 exercises are multidirectional, with faster speeds and/or greater load; they require higher levels of tissue and neural tolerance than Levels 1 and 2. Exercises in Level 3 mimic the neural, mechanical and metabolic demands the client may experience in daily life or sport. The exercises are complex, so you need to establish proper rhythm before progressing.
Sandbell® Ice Skater
| Exercise Instructions | |
|---|---|
| Setup | Using claw grip with left hand, stand on left leg. |
| Execution | Laterally bound onto right foot while driving left hand in front of knee. Allow left leg to swing behind right leg to load hip laterally. Bound back to left leg and repeat for desired rep range before switching. |
| Tips |
|
| Progressions |
|
| Benefits |
|
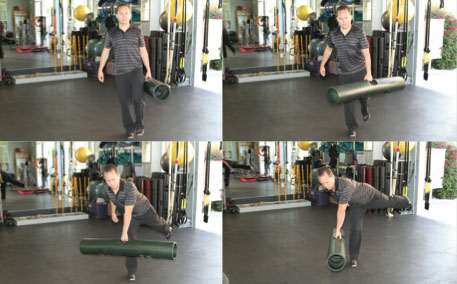
ViPR Rotational Overhead Deadlift
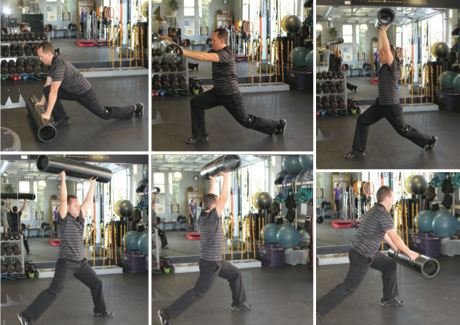
| Exercise Instructions | |
|---|---|
| Setup | Begin in split stance, right leg forward and foot flat. Left leg is back and on toes. Place ViPR in front of right foot horizontal to toes. |
| Execution | Squat down onto right foot and pick up ViPR in neutral grip. Lift ViPR overhead while pivoting feet 180 degrees; then place ViPR down slowly in front of left foot and let go. Repeat for desired reps. |
| Tips |
|
| Progressions |
|
| Benefits |
|
Frontal-Plane Dumbbell Deadlift
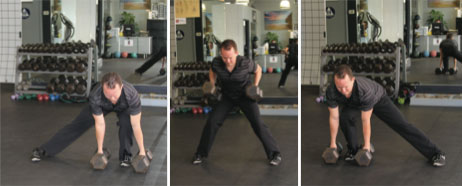
| Exercise Instructions | |
|---|---|
| Setup | Start in wide stance with dumbbells (DBs) lying in front of left leg. Feet should point straight ahead or even slightly inward to put more length through glute complex. |
| Execution | Shift weight over left leg, flexing ankle, knee and hip. Lift DBs off ground to hip height, and shift hips over right foot, decelerating DBs back to ground in front of right foot. Repeat for desired reps. |
| Tips |
|
| Progressions |
|
| Benefits |
|
Workout A
| Exercise | Sets | Reps | Rest |
|---|---|---|---|
Superset 1:
|
2–4 |
|
|
Superset 2:
|
2–4 |
|
|
Superset 3:
|
2–4 |
|
|
Superset 4:
|
2–4 |
|
|
Workout B
| Exercise | Sets | Reps | Rest |
|---|---|---|---|
Superset 1:
|
2–4 |
|
|
Superset 2:
|
2–4 |
|
|
Superset 3:
|
2–4 |
|
|
Putting It All Together: Hybrid Glute Workout
Workout A uses a superset format to bridge the gap between conventional and progressive approaches to glute- strength training. The first exercise in each superset is a Level 1 or Level 2 progressive exercise followed by a heavy, linear conventional exercise. The intent is to mobilize the major joints of the body and increase neuromuscular recruitment, with progressive exercises enabling increased performance in the conventional exercises. To place adequate mechanical stress on the glute area, it would be wise to increase the volume and intensity each week.
Workout B also uses the superset format but places a heavy, linear conventional exercise on the body first before attempting a Level 3 progressive exercise. The heavy stress and multidirectional movements create unique multidirectional mechanical stress into the glutes for optimal neuromuscular recruitment and enhanced connective-tissue tolerance.