
Whole-Body Strength Training Using Myofascial Lines
Fascia has been enjoying the limelight in the fitness industry as one of the hottest topics in recent conference programming, workshops and publications. However, after the dust has settled, will fitness professionals still be scratching their heads and wondering, “Okay, great, it’s important, but what do I do with it? How does this affect my training? How do I apply this with my clients?”
A great place to start is with the writings of Thomas Myers, whose April 2011 article in IDEA Fitness Journal titled “Fascial Fitness: Training in the Neuromyofascial Web” provides the fitness pro with an arsenal of research and ideas on how to train the fascial web. If that whets your appetite for further study, see Myers’s 2001 book Anatomy Trains: Myofascial Meridians for Manual and Movement Therapists (Churchill Livingstone 2001), which offers a unique perspective on the body’s internal design and has sparked research into fascia (or connective tissue) and its role in human movement and function.
This article offers eight key take-home points regarding fascia and fitness and then demonstrates how to train four myofascial lines using common exercises and tools.
8 Key Take-Homes on Fascia
Fascia forms a whole-body, continuous three-dimensional matrix of structural support around our organs, muscles, joints, bones and nerve fibers. This multidirectional, multidimensional fascial arrangement also allows us to move in multiple directions (Myers 2001; Huijing 2003; Stecco 2009).
Have you ever watched parkour athletes jump down from a two- or three-story building, tumble and smoothly transition into a run? How do their joints not explode on impact from the fall?
The answer is that internal force (from muscle) and external force (gravity and ground reaction) are transmitted and dispersed within the body primarily via the fascial network (so long as the force is not too great). Fascia helps prevent or minimize localized stress in a particular muscle, joint or bone, and it helps harness momentum created from the operating forces mainly through its viscoelastic properties. This protects the integrity of the body while minimizing the amount of fuel used during movement.
The myofascial lines depicted in Anatomy Trains give us a clearer picture of how the fascia mitigates stress—and force—through the body depending on the direction and application of force (Myers 2001; Huijing 2003; Sandercock & Maas 2009).
Davis’s law states that soft tissue, a form of fascia, will remodel itself (becoming stiffer and denser) along lines of stress (Clark, Lucett & Corn 2008). This can have short-term benefits and long-term consequences. When we practice a movement repetitively, soft tissue will remodel itself in the direction of the desired movement so that the tissue becomes stronger at dealing with the forces in that particular direction. Long-term repetition can make fascia stiffer along the line of stress, but weaker in other directions, resulting in a possible higher frequency of tears in the fascia itself or immobility in the surrounding joints when moving in different directions. The same can be said of repetitive nonmovement, such as sitting or standing, for long periods across days, months and years.
A 1995 study demonstrates that mechanical stress (exercise) can induce hypertrophy of a ligament, a form of fascia (Fukuyama et al. 1995). New studies demonstrate the fascia system’s ability to heal itself after being torn. One such study found some people with anterior cruciate ligament (ACL) tears were able to return to full function without surgery and that the ACL healed completely (Matias et al. 2011). As we learn more, we may see new types of rehabilitation techniques, as well as changes in what we believe to be ideal form for some exercises.
which allow smooth-muscle-like contractions to occur, have been found in fascia (Schleip et al. 2005). Numerous mechanoreceptors (Golgi tendon organs, Ruffini endings, Paciniform endings) have also been identified within the fascial matrix; these may be contributing to the smooth-muscle-like contractions and communicating with the central nervous system regarding the amount of shear forces within the connective tissue (Myers 2011). It is theorized that contraction of the fascia aids in stability and energy expenditure. More research is needed to understand how fascia and muscle contract in concert with one another, how these contractions affect overall movement and what they mean for the fitness professional.
Fascia is always under tension as long as gravity is present. This passive pre-tension has been called human resting myofascial tone—which Myers discusses using the principle of tensegrity (Alfonse et al. 2010; Myers 2001). Resting myofascial tone provides a low-level stabilizing component that helps our posture and allows us to perform movements like getting in and out of a car without thinking about them.
Because connective tissue has 10 times more proprioceptors than muscle (Myers 2011), the fascial matrix helps us react to our environment faster than the conscious mind can respond, whether we are unexpectedly stepping off a curb, reacting to an opposing player in a sport or drawing a hand off a hot stove.
This pre-tension may also give us the ability to maintain posture with less fatigue and fascial strain as compared with constant muscle activation and energy expenditure. As an anecdote to this, a deconditioned client of mine commented on how she could stand and cook in the kitchen for 8 hours straight pain-free one Saturday, a task she could not have performed before her training. Could it be that her training had helped improve tensegrity and increase pre-tension through the fascia?
In their book The Endless Web: Fascial Anatomy and Physical Reality (North Atlantic 1996), R. Louis Shultz and Rosemary Feitis discuss how our emotions are stored within the body, including the connective tissue.
“The physical response to emotion is through the soft tissue,” they write. “The fascia is the emotional body. . . . Ideally, feelings are felt in the total body—emotions travel through the fascial web. We then interpret the physiological sensation as anger, affection, love, interest and so forth. . . . The reason your neck can’t straighten and lengthen may be because of the shock of being continually bullied in childhood. Physical work will only partially open that problem unless there is recognition that there may be an emotional origin.”
Using this concept, the fitness professional can develop a holistic approach to understanding posture and movement—an approach that sees them, not just as physical, but as emotional and psychological as well. Fascia may become stiffer and less compliant when a client is depressed, anxious and fearful (Shultz & Feitis 1996; Lowe 1989). Trainers see this when clients show up after having a miserable day. Mood greatly influences posture, movement and proprioception. Perhaps enhancing mood may enhance the physical state through the fascial web.
In Myers’s work, dissections demonstrated that connective tissue not only envelops muscle, bone and organs but does so continuously through many layers (Myers 2001). This link connects us holistically in movement and function. For athletes or others looking to improve or maximize function, the fascial web gives us a rationale for incorporating whole-body movements into our training regimens.
Application: Training Myofascial Lines
Training myofascial lines with whole-body exercises has unique benefits. It dissipates force throughout the entire system, minimizing excessive isolated joint tension while giving our joints freedom to move in all three planes of motion and improving total-body awareness and coordination. Choosing exercises that vary in direction, force and speed also promotes fascial health (Myers 2011).
In Anatomy Trains, Myers depicts numerous myofascial meridians. To ease into an understanding of how to place force through these lines, we will explore the superficial front and back lines, the lateral lines and the spiral lines. Table 1 summarizes some of the key components for incorporating myofascial lines into exercise selection and performance.
To place force through a line, the line must first load to unload, or stretch to shorten. This allows us to take advantage of the viscoelastic properties of fascia, helping us generate and transmit force throughout the entire body while minimizing energy expenditure. Based on the force profile (mass, acceleration, momentum, direction and application) of a given exercise, we can emphasize which myofascial line to upregulate (load). Table 2 summarizes the primary functions of four myofascial lines and how to load them.
Sample Exercises
The exercises in the charts place tension on specific myofascial lines. We cannot isolate myofascial lines during a movement, but we can emphasize an upregulation of a particular line based on our basic understanding of biomechanics, so you may notice multiple lines being loaded in these exercises. There are four categories:
1. TRX® Myofascia Mobilization. These techniques create passive extensibility through myofascial lines and enhance joint stability. Movements should be rhythmic, slow and subtle with small to medium ranges of motion, conducted in an environment that is stable enough to allow good control of the movements. One to two sets of 5–10 reps should be sufficient to create an appropriate amount of extensibility.
2. Body Weight Anterior Lunges. Using the arms as a driver, we can upregulate any myofascial line during a simple anterior lunge. This is a great way to enhance total-body flexibility, stability and/or strength depending on how the acute variables are manipulated.
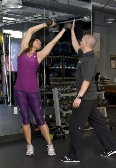
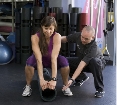
3. Whole-Body Dumbbell Shoulder Press. Driving the hips in multiple directions while performing the overhead press will help disperse force away from the shoulders, helping to maintain the integrity of the shoulders while still improving strength. It is advisable for clients to try these exercises with no weight at first, so they learn how to drive the hips when reaching overhead before adding load to the movements.
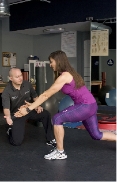
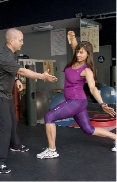
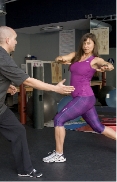
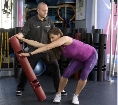
4. ViPR™ Squats With Four Holds. Traditionally an exercise for the superficial back and front lines, the squat can be modified to upregulate numerous myofascial lines depending on how we hold and drive a ViPR.
Functional Anatomy for Functional Results
The more we learn about our connective tissue, the more we can integrate it with the other systems of the body (muscular, nervous, skeletal) and gain further insight into human movement and performance. Using myofascial lines in our training can give us a unique perspective on how to maximize our ability to mitigate force, save energy and build endurance while improving multijoint mobility and strength. Training the body as a whole in three dimensions, as opposed to training isolated, segmented parts, may be a missing link in the exercise programs of people looking to maintain or improve the integrity of their bodies. Fitness professionals can now use functional anatomy to give clients functional results.
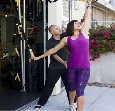
Setup: Start with feet hip/shoulder width apart, facing away from anchor point. Arms are at shoulder height.
Movement:
1. Take small step forward.
2. Focus on driving front knee forward while keeping trunk erect.
3. Return to start once you reach point of first tension.
Expect to feel tension through hip flexor, abdominal wall and/or pectoralis.
Progression: Take bigger step.


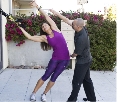
Setup: Start with feet hip/shoulder width apart, facing toward anchor point. Arms are at chest height, knees slightly bent.
Movement:
1. Drive hips back while maintaining same knee flexion.
2. Allow body to fall back into hips.
3. Return to start position once you reach point of first tension.
Expect to feel tension through erectors, lats, glutes, hamstrings and/or calves.
Progression: Lift toes.
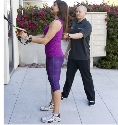

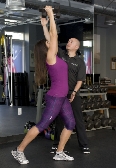
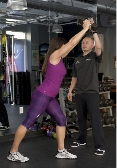
Setup: Start with feet in narrow stance, facing quarter-turn away from anchor point. In single-handle mode, grab TRX with one hand at shoulder height.
Movement:
1. Allow body to fall laterally by driving hips to side.
2. Drive opposing arm overhead and toward anchor point.
3. Return to start once you reach point of first tension.
Expect to feel tension through peroneals, lateral hip, obliques, lats and rib cage.
Progression: Cross opposite leg to increase range of motion (if necessary).

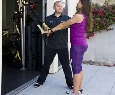
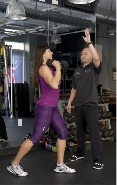
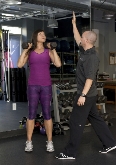
Setup: Start with feet shoulder width apart, facing toward anchor point. Arms are in front of hips, palms facing down.
Movement:
1. Drive left arm to left and overhead while pivoting right foot in same direction.
2. Return to start position once you reach point of first tension.
3. Repeat on other side.
Expect to feel this exercise through mid/upper back, abdominal wall, hip flexors, hip extenders and/or lateral compartment of lower leg.
Progression: Don’t pivot foot.
Setup: Start in staggered stance with dumbbells at shoulder height, both knees slightly flexed.
Movement:
1. While pressing overhead, drive anterior knee forward.
2. Head should remain on same level throughout movement (not squatting while pressing).
3. Return to start position and repeat.
Regression: Perform exercise kneeling.
Progression: Look up while reaching overhead and/or reach overhead and slightly posteriorly.

Setup: Start in staggered stance with dumbbells at shoulder height, both knees slightly flexed.
Movement:
1. While pressing overhead and forward, drive hips back and down.
2. Allow back knee to flex while flexing hip.
3. Return to start position and repeat.
Regression: Start hip width apart.
Progression: Add posterior step.
Setup: Start with feet shoulder width apart, dumbbells at shoulder height, both knees slightly flexed.
Movement:
1. While pressing overhead and laterally, drive hips in opposite direction from arms.
2. Follow dumbbells with eyes.
3. Return to start position and repeat.
Regression: Perform with one arm.
Progression: Start with one foot crossed over other foot.
Setup: Start with feet shoulder width apart, dumbbells at shoulder height, both knees slightly flexed.
Movement:
1. While pressing overhead, pivot one foot internally.
2. Be sure to keep big toe down on both feet.
3. Return to start position and repeat.
Regression: Start with one foot already internally rotated.
Progression: Add rotational step in same direction as overhead press.

Setup: Start with feet hip/shoulder width apart.
Movement:
1. Take step forward, and while driving pelvis toward floor, reach overhead with arms.
2. Focus on driving front knee forward while keeping trunk erect.
3. Return to start position and repeat with opposing leg.
Regression: Start in staggered stance and eliminate step.
Progression: Look up while reaching overhead.

Setup: Start with feet hip/shoulder width apart.
Movement:
1. Take step forward, and while driving pelvis toward floor, reach arms down in front of knees.
2. Reach from scapulae and allow thoracic spine to flex while hips and knees flex (flex with rhythm).
3. Return to start position and repeat with opposing leg.
Regression: Start in staggered stance and eliminate step.
Progression: Look down while performing exercise to load line more.
Setup: Start with feet hip/shoulder width apart.
Movement:
1. Take step forward, and while driving pelvis toward floor, reach arms overhead and to same side as anterior leg.
2. Allow hips to move in opposite direction from arms.
3. Return to start position and repeat with opposing leg.
Regression: Start in staggered stance and eliminate step.
Progression: Drive same-side arm as anterior leg away from body and toward floor.
Setup: Start with feet hip/shoulder width apart.
Movement:
1. Take step forward, and while driving pelvis toward floor, reach arms across body at chest height and toward same side as anterior leg.
2. Be sure to keep big toe of both feet on ground and allow hips (not just torso) to move with rotation.
3. Return to start position and repeat with opposing leg.
Regression: Start in staggered stance and eliminate step.
Progression: Drive arms away from anterior leg.
Setup: Stand hip width apart and hold ViPR across upper chest by shovel handle, keeping elbows up.
Movement:
1. Maintain ViPR across chest and squat to appropriate level (i.e., what is right for the client).
2. Maintain thoracic extension.
3. Return to start position and repeat.
Regression: Hold lighter ViPR with neutral grip anterior at chest height.
Progression: Raise arms overhead.


Setup: Place ViPR on floor between legs. Grab end of ViPR with both hands. Feet will be in line with first neutral handgrip.
Movement:
1. Squat to appropriate level while driving hands to knee or shin height.
2. Allow thoracic flexion as long as client can return to neutral when standing up.
3. Return to start position and repeat.
Regression: Use larger ViPR (for assistance).
Progression: Hold with one arm.

Setup: Place ViPR on end to one side of body. Hold onto ViPR with one hand on neutral handle, feet shoulder width apart.
Movement:
1. Squat to appropriate level while tilting ViPR laterally away from body.
2. Allow hips to shift in opposite direction from tilt.
3. Return to start position and repeat.
Regression: Place ViPR in front of body and tilt ViPR laterally.
Progression: Do single-leg squat.

Setup: Hold onto ViPR with left hand in shovel grip (supinated), right hand on end. Feet are hip width apart with ViPR on right hip.
Movement:
1. Squat to appropriate level with ViPR on right side. As you stand, drive ViPR over left shoulder.
2. Allow right foot to pivot internally while standing up.
3. Return to squat position and repeat, reversing hand and footprint for other side.
Regression: Use neutral grip instead of shovel grip.
Progression: Use wide grip instead of shovel grip.

