
Yoga Fundamentals: Pose by Pose
Hatha yoga, the yoga that uses the body as a vehicle for meditation, has consisted of 84,000 asanas, or poses, throughout history. Open the book Light on Yoga by B.K.S. Iyengar and you could feel overwhelmed by all the poses it describes. When teaching hatha yoga, what are the fundamental, or central, themes to focus on, and among the numerous poses, which are the fundamental, or most important, ones for your students to practice?
Fundamental
Themes of Yoga
In yoga, the following themes are essential:
Alignment. It is vital to pay attention to alignment, or symmetrical range of motion right to left, in poses. Yoga practice can help students discover how to monitor the intensity of forces needed to achieve strength and stability in any given pose for the purpose of stillness and meditation.
Anatomy. All yoga teachers need a strong knowledge of anatomy. This means not just memorizing muscles and bones, but learning about joints—their capabilities and structure—and the associated muscular attachments.
Force. Paramount in the teaching of yoga is the understanding that we are responding to force. We must understand how a force becomes a resistance; learn how to apply force; and look at what—in our anatomy—opposes and creates force. We have muscle that is designed to develop tension and to directly or indirectly oppose forces that occur inside and outside of the body. According to Tom Purvis, PT, “Force, or the lack thereof, is a, if not the primary, initial stimulant of virtually every physiological process that is required for human existence, much less human performance” (© 1997 RTS® Programs).
Limitation. There are reasons for limitation and tightness in the body. When we observe students’ poses, we must look beyond their outer appearance and begin to see the joints beneath the skin. Many instructors are quick to push students into positions that were handed down from other yoga lineages. It is fundamental for yoga practitioners to understand the reasons for their tightness. These might include muscle inhibition (lack of neuromuscular integrity), tissue bulk, joint structure, arthritic changes, chronic adaptive shortening, noncontractile tissue participation, age, dehydration and so on. One cause of muscle tightness can be weakness. Since yoga is about holding isometric positions, it can strengthen weak areas if poses are performed correctly.
Individuality. The most important aspect of yoga that many teachers and practitioners miss is attention to the individual. Realizing that not every body can fit into every pose is crucial. We must see that in addition to having general anatomical knowledge, there is also the anatomy of the individual to consider. Yoga practice should never violate the body’s current status and range of motion. We cannot stretch someone or ask someone to move further into passive ranges unless we know everything about the limitation that is present. An understanding of how to microprogress® a student into a given position is extremely important.
Getting Back to Basics:
5 Poses
Many instructors are bored with looking at the “basics.” We like to learn new poses and new ways to choreograph them, and we are impressed when an instructor can “get into” advanced poses. However, as a colleague of mine, Paul Ciske, PhD, RTSm, MATm, says, “If I am not in awe, I am not paying close enough attention.” Maybe we all need to get back to the basics and see the millions of details we have missed in our haste to progress.
What happens if we take a fresh approach to teaching some of the basic poses? Instead of blindly doing what we’re used to, our thought process can include
- looking at the traditional method of practice;
- deciding if there could be a better approach;
- identifying joints involved in the pose;
- identifying the forces needed to achieve the position that an individual is capable of;
- determining cues that would help a student achieve the pose; and
- adjusting the process to account for each individual’s barriers to ROM and ability.
Let’s apply this process to five fundamental yoga poses.
Supta Padangusthasana Supine Big-Toe Pose

Traditional Method. Lie supine on mat, flex involved hip, extend knee and dorsiflex ankle. Place strap around bottom of foot, or grab foot/big toe, and pull hip further into flexion. Common adjustments include teacher pushing student’s hip further into flexion and pushing opposite hip further into floor or student pulling herself further into passive ranges.
Could there be a better approach?
Joints Involved. Hip (flexion), knee (extension), ankle (dorsiflexion) and shoulder (scapular retraction).
Forces. Resist hip flexion by placing hand on front of student’s thigh. Instruct student to press opposite leg against floor in order to perform hip extension.
Cues. “Press thigh lightly into hand while actively drawing dorsal surface of foot toward knee. Think of lightly pulling foot away from belt to draw attention to anterior shin muscles.”
Individual Barriers to ROM and Ability. Check student’s ability to dorsiflex right and left (R-L) ankles, and to flex R-L hips, with flexed knee to make sure pose does not violate active range of motion (AROM). Also, assess individual’s ability to be supine on floor when gravity is pushing against her.
Setu Bandha Sarvangasana Bridge Pose
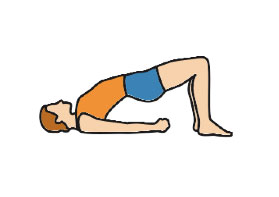
Traditional Method. Lie supine, bend knees with feet hip width apart, retract scapulae into mat, and press arms into floor (shoulder extension). Press hips off floor without collapsing into cervical flexion. Common adjustments include instructor pulling student’s hips further into extension and holding student’s shoulders down on floor.
Could there be a better approach?
Joints Involved. Hip (extension), ankle/foot (maintaining ankle dorsiflexion), shoulder (scapular retraction and depression) and spine (extension).
Forces. Use superiorly directed force to resist hip extension by placing your hands on top of student’s pelvis. Ask student to press gently into your hands. Student is to press shoulders against floor to resist shoulder extension and scapular retraction.
Cues. “Draw heels of feet into floor and toward head to apply force to hip extension and knee flexion; press arms down into mat, and adduct toward body to apply force to scapular retraction and adduction.”
Individual Barriers to ROM and Ability. Check AROM in extension by having student extend actively in standing position before performing bridge pose. Also check how much R-L shoulder extension is available, to make sure range is not violated when hips are pushed up into bridge pose.
Adho Mukha Svanasana Downward-Facing Dog
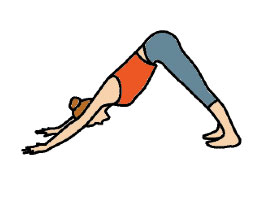
Traditional Method. Begin on hands and knees, with hands placed on floor, slightly wider than shoulder width apart. Press toes into floor with feet hip width apart and parallel. Push off floor so that hands and feet touch floor with hips pressing upward into inverted “V” shape. Common adjustments include instructor pushing student’s hips back to elongate spine; rolling shoulders away from neck by externally rotating them; pulling hips to ceiling; and pushing heels of feet down into mat to increase ankle dorsiflexion.
Could there be a better approach?
Joints Involved. Ankle (dorsiflexion), toes (extension), knee (extension), hip (flexion), spine (extension), shoulder (flexion), elbow (extension) and wrist (flexion).
Forces. Resist hip extension by placing your hands on student’s upper thighs or rib cage; have student press into you lightly to resist hip flexion. You will need to use hand placement to draw attention to knee and elbow flexion; alter forces in upper and lower extremities by having student press into yoga mat in different ways.
Cues. “Activate/Focus attention on legs to take stress off upper extremities. Press hands down into mat and away/toward each other to change forces on shoulders and elbows. Focus on shins and dorsal surface of feet to strengthen ankle dorsiflexion.”
Individual Barriers to ROM and Ability. Address possible turnout of feet, and realize that straightening the feet or predetermining the width between them can alter hip capabilities. Check active hip and shoulder flexion, R–L. Student may need to come out of pose slightly to keep from violating current ROM.
Janu Sirsasana
Seated Head-to-Knee Pose
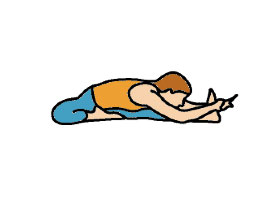
Traditional Method. Sit on floor, with 90 degrees hip flexion. Flex one knee, externally rotate hip and attempt to place knee on floor, keeping other knee at full extension. Rotate toward straight leg, hold foot and flex hip forward to bring head to knee. Common adjustments include pressing externally rotated hip into floor; pushing knee to floor; pushing further into hip flexion; and having torso passively rotated by the instructor.
Could there be a better approach?
Joints Involved. Ankle (dorsiflexion), knee (extension/flexion), hip (flexion), hip (external rotation), spine (flexion, rotation) and shoulder (flexion).
Forces. Apply anteriorly directed force (place your hand on student’s clavicle) and have student press into you to resist hip flexion. Place block under knee if it is not on floor, for student to resist external rotation with abduction.
Cues. “Press extended knee into floor, and focus on drawing femoral head into hip; press into externally rotated hip to help assist in rotation; think of moving opposite side of rib cage to straight leg; focus on spinal extension while keeping attention on hip flexors to avoid collapsing into flexion.”
Individual Barriers to ROM and Ability. Check to see if student has 90 degrees of hip flexion or may need something under pelvis to increase hip angle. Check hip external rotation, R-L, with bent knee and with straight leg.
Trikonasana
Triangle Pose

Traditional Method. Stand with feet 31/2–41/2 feet apart. Turn R foot 180 degrees, L foot about 45 degrees. Bend sideways to the right, and place hand on foot or lower leg. Stretch left arm to ceiling and look at left hand. Common adjustments include instructor pulling torso back to stay over forward leg, pulling student’s arms farther apart; and pulling student’s shoulders further into retraction. Also, student can use assistance of gravity to pull herself further down into pose.
Could there be a better approach?
Joints Involved. Foot (reacting to ground forces), ankle (reacting to ground forces), knee (extension), hip (rotation, abduction), spine (side bend, extension), shoulder (abduction, scapular retraction) and cervical spine (rotation).
Forces. Place hand on upper back to draw attention to scapular retraction and spinal extension. Pay attention to pressure on feet to adjust forces on hips.
Cues. “Draw front foot toward back foot by pressing down and into mat. Root back foot so that big toe, little toe and heel are accounted for. Draw front leg deeper into hip socket to increase lateral flexion of trunk and integrity of hip musculature.”
Individual Barriers to ROM and Ability. Address available range of hip abduction, R-L. Add external rotation, R-L. Assess whether foot placement violates hip range. Assess lateral trunk flexion, R-L, and foot/toe differences between R-L (e.g., check for bunions, one foot flatter than the other, etc.).
The teaching of yoga is a lifelong process of learning, starting with mastery of the basics. Mind and body are connected, to the point of being one. In the words of B.K.S. Iyengar, “If you look after the root of the tree, the fragrance and flowering will come by itself. If you look after the body, the fragrance of the mind and spirit will come of itself.”