Pilates Exercises for Breast Cancer: Rebuilding the Foundation, Part Three
In this third part of our phase one programming for breast cancer survivors it’s critical to acknowledge the importance of parts one and two of the program, adhere to the goals of each segment and honor your client’s readiness to progress. There is no definite time frame allotted for each part—it truly depends upon the client’s success and comfort level.
The phase one exercises are essential building blocks recommended for a lifetime.
Follow these simple guidelines to assess readiness to progress:
- The client has developed a good understanding of basic Pilates biomechanical principles.
- The client applies Pilates principles both during the sessions and in daily life activities.
- The client remembers from session to session the skills reviewed previously and the lessons are becoming second nature.
- The client can maintain proper alignment throughout each repetition.
- The client leaves the session energized, not fatigued.
- The client experiences no residual soreness or discomfort post-workout.
Part Three Movements
As previously stated, the exercises here do not replace those shown in parts one and two; they are a continuation and are meant to be executed in the order in which they have been outlined.
If you have been scheduling your client’s workouts for 30 minutes, two to three times per week, you may opt to increase one of those weekly sessions to 40 minutes. This will help develop the client’s exercise endurance and give you a nice arena to add in the new repertoire.
It’s important to work within the guidelines outlined in part two: only add one or two new exercises at a time and vary the exercises from upper to lower body to avoid overtaxing one area.
You will note we have added the STOTT PILATES® FlexBand Exerciser® and 1- or 2- pound Toning Balls to either support the weight of the limbs and/or provide gentle resistance. Note: the movements may be done without the props.
- Side-lying Arm Circles
- Hip Rolls
- One Leg Circles
- Swimming Preps
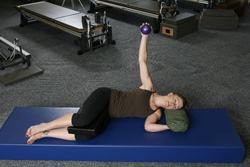
1. Side-lying Arm Circles with STOTT PILATES® Toning Balls
Benefits: This move improves shoulder joint mobility and increases blood flow to the joint. The ball provides proprioceptive feedback and adds gentle resistance. The light load helps recruit the deep stabilizing muscles (e.g. rotator cuff).
Note: Only do this exercise if the client is comfortable lying on her side.
Start Position: Lie on side with both knees bent and a spacer between thighs to keep the hips more neutral. Head rests on a pillow or cushion; spine is neutral, top arm reaches toward the ceiling. Hold toning ball in the palm, facing forward.
Exercise and Breath Pattern:
- Inhale: make tiny circles in one direction for 5 counts.
- Exhale: make tiny circles in the other direction for 5 counts.
- Repeat for five full breath patterns.
Beneficial Cues:
- Keep the movement very small and execute circles slowly.
- Feel as though the ball is resting gently in your hand; do not grip.
- Keep the arm directly over the shoulder joint.
- The movement should feel like a shoulder massage.

2. Hip Rolls
Benefits: This exercise encourages proper sequencing and fluidity of the spine, pelvis and femurs. The goal is to strengthen the abdominals, hip and spinal extensors while relieving tension. While appropriate for all breast cancer clients, this is especially beneficial for those who have had TRAM flap surgery and experience core weakness and lumbar spine and hip flexor tension.
Start Position: Lie supine on the mat with spine neutral, knees flexed, legs hip-distance apart, arms long by sides. You may use a spacer between knees to encourage proper alignment (place pillow under arm of affected side if necessary).
Exercise and Breath Pattern:
- Inhale to prepare.
- Exhale, engage abdominals to rock pelvis away from the femurs. Activate the glutes and hamstrings and lift the pelvis, rolling through the lumbar spine until the hips are in line with shoulders.
- Inhale, stay at the top of the movement.
- Exhale, roll down—starting at the upper spine—all the way back to the start position.
- Repeat 3-5 times.
Beneficial Cues:
- Activate the abdominals first, then the glutes and hamstrings.
- Use your exhalation to activate the deep abdominal muscles and take the tension out of your neck and shoulders.
- Re-engage the abdominal muscles before rolling back down from the top position.


3. One Leg Circle
Benefits: This exercise focuses on spinal stability in neutral against a circular leg movement. It brings blood flow to the hip joint, mobilizing the hip, and brings attention to the use of breath to activate the inner core musculature (e.g. transversus abdominus, pelvic floor and multifidus). This is another exercise that is very specific for developing core and spinal strength and stability for those who have had TRAM flap surgeries.
Start Position: Lie supine on the mat with spine neutral, both knees bent with band wrapped around one leg (which is in the tabletop position). The other foot is flat on the mat. Arms are bent, hands hold band with an overhand grip and palms face body. (do not wrap the band around the wrist). Note: If the client needs arm support on the affected side, place a cushion under the elbow.
Exercise and Breath Pattern:
- Inhale, allow the leg with the band around it to cross the mid line of the body.
- Exhale, continue to circle the leg downward, outward and around back to start position, maintaining a neutral spine throughout.
- Repeat 3 – 5 times on both legs.
Beneficial Cues:
- Use your exhalation to maintain core stability as you circle the leg.
- Keep the range of motion small enough so you can maintain core stability.
- Allow the band to support the weight of the leg; avoid gripping in the hip.
- Press against the band to activate the hamstrings, releasing the hip flexors.
- Keep the foot on the floor energized to help stabilize pelvis and spine.
- Watch that the pelvis doesn’t rock and roll.


4. Swimming Preps
Benefits: This exercise helps retrain oppositional movement patterning between the upper and lower body, which is essential in daily functional movements. For example, when we walk it’s natural to swing our arms and legs in opposition. This exercise also brings awareness to how our abdominals support our spine against gravity. Four-point kneeling is a perfect position to notice and feel this effect. Note: it may be uncomfortable for a client to bear weight on her arms. Avoid this exercise if it creates tension.
Start Position: Kneel in “four points” with the hands directly under the shoulders and the knees under the hips. Entire spine is neutral and knees are hip-distance apart.
Exercise and Breath Pattern:
- Inhale to prepare.
- Exhale, engage abdominals with the breath and lift the opposite arm to leg.
- Inhale and return back to the start position.
- Repeat 3-5 times consecutively with one side, and then do the other side (opposite arm to leg).
Beneficial Cues:
- Think length, not height, when lifting arms and legs.
- Engage the abdominals to keep the spine from sinking.
- Activate the glutes to lift the leg.
- Visualize the hips are headlights shining on the mat in front of you.
- Hold a ruby in your navel and do not let it drop.


PJ O’Clair is the owner of Northeast Pilates Certification Centers and Master Instructor Trainer, STOTT PILATES®.