Using Anti-Rotation to Coach Rotation
Incorporate transverse-plane core work into your foundational movement training paradigm.
|![]() Earn 1 CEC - Take Quiz
Earn 1 CEC - Take Quiz

When you watch someone hit a golf ball, throw a punch or simply retrieve groceries from the car, it’s evident that human movement occurs in all three planes of motion. A review of basic core anatomy—major muscles attached to the trunk, above the ischial tuberosity and below the superior aspect of the sternum—reveals that 87.5% of the core muscles are oriented either diagonally or horizontally, and one action that these muscles perform is rotation (Santana 2000). The diagonal muscle orientation is proof positive that the human body is designed to rotate—and why anti-rotation and rotation coaching is important.
The “serape effect,” first introduced by Logan and McKinney in 1970, shows how the internal and external obliques, rhomboids, and serratus anterior produce rotational force for throwing and kicking (Logan & McKinney 1970). The serape effect concept has been expanded to include the powerful hip flexors and adductors in the lower extremities, further demonstrating the spiral line architecture of the human body (Santana, McGill & Brown 2015).
However, it is still common for many personal trainers to design programs that have a sagittal- and frontal-plane training bias. Those who do consider the transverse plane in their programming often—to their clients’ detriment—lack the requisite knowledge to coach and cue progressions that will optimize performance. This article explores how to train anti-rotation and rotation, why that’s important for daily life and sports, and how to safely and effectively train a client through a basic rotational progression.
Function and Form

The core’s function is not simply for forward bending, as in traditional situps. “The muscles and tendons of the active subsystem are the means by which forces are generated to maintain spine stability” (Colston 2012). One main function of the core is to stabilize the spine and pelvis in a neutral zone, which enhances power transfer and reduces shear loading on the spinal disks (Colston 2012).
Research supports this concept by stating that core musculature is organized similarly to an architectural tensegrity model (McGill 2007). Think of an army tent with guy wires. The weight of the canvas provides some stability through compressive loading, but the main stability comes from the lateral guy wires that come off the frame in a 360-degree fashion, providing tensile loads. McGill proposes that core muscles function in a similar way, originating from and inserting at angles on the spine, pelvis and ribs. This “human guy-wire system,” when functioning properly, provides spinal stability through both compressive and tensile loads. The core’s guy-wire system not only reduces injuries by stabilizing the spine but also stores elastic energy for tasks that involve force production.
Baseline and Progression
The analogy of firing a cannon from a canoe comes to mind when considering the importance of core stability. One of the best examples of the core’s function in stability comes from research done by Juan Carlos Santana and team, in which they compared kinetic and electromyographic metrics for a standing cable press versus a traditional bench press (Santana, Vera-Garcia & McGill 2007). They found that individuals could bench-press only half of their body weight while standing, and when they failed during a standing press, core stability (or lack of it) was the limiting factor. Simply put, this indicates that stiffening the torso causes “power generated at the hips [to be] transmitted more effectively by the core” (McGill 2010).
Where does a trainer start if core stability is a limiting factor in power transfer and, at some point, transverse-plane loading needs to be introduced? McGill suggests beginning with three exercises that are excellent for preventing lower-back pain or for introducing clients to a core performance program (McGill 2007). Modified curl-up, side plank and bird dog are known as the “the big three”—a perfect starting trio for most clients (below). Once a client is proficient in McGill’s ground-based big three, it’s time to progress to “the standing big three.” Although there can be many steps between ground-based core drills and standing versions, the Pallof press, cylinder rotation and horizontal chop with lead-leg step present a logical progression (below).
Optimizing the Transverse Plane
Human movement is a complex interplay of all three cardinal planes of motion, and rotational training with anti-rotation should not be an afterthought. Regardless of fitness level or goals, a trainer must understand the importance of transverse-plane movement to help clients maximize performance and reach their goals. First and foremost, knowing functional core anatomy and how it relates to healthy, safe programming is key. Once you understand the mechanics of motion in the lower back, mid back and hips, you’re ready to include rotational movements and, as appropriate, to start progressing clients from the big three to the standing big three. You now have a simple-to-follow transverse-plane exercise series to incorporate into your foundational movement training—a series that will enhance functional outcomes for your clients.
See also: Core Stability for Enhanced Daily Function
The Big Three
Stuart McGill, PhD, a leading researcher and core performance expert, advocates using anti-rotation movements he calls “the big three.” They offer a great starting point for most clients wanting to “bulletproof” the core and protect the lower back from injury.
MODIFIED CURL-UP
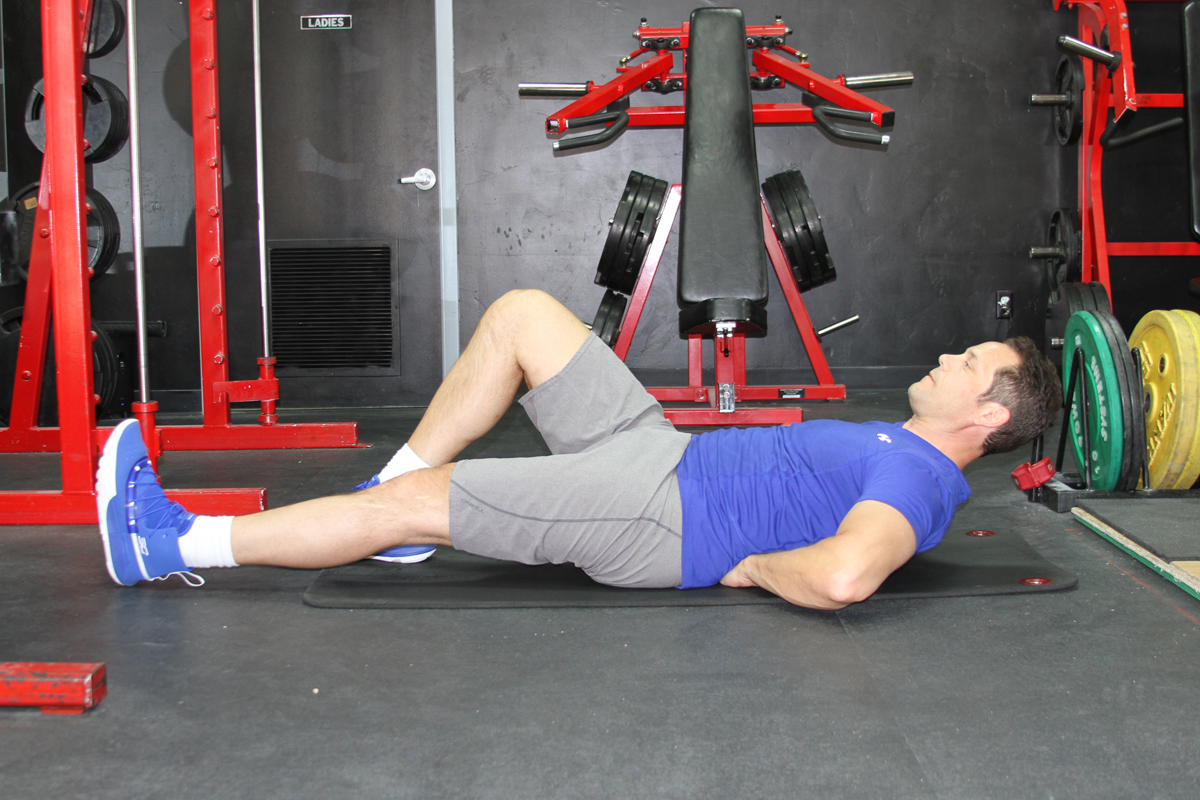
- Place one leg straight and bend other leg to 90 degrees, hands beneath lower back.
- Lift head and shoulders straight up toward ceiling (but not in traditional “crunching” motion).
- Engage core while changing spine’s position as little as possible.
- Perform three 10-second holds, then switch legs and repeat.
SIDE PLANK
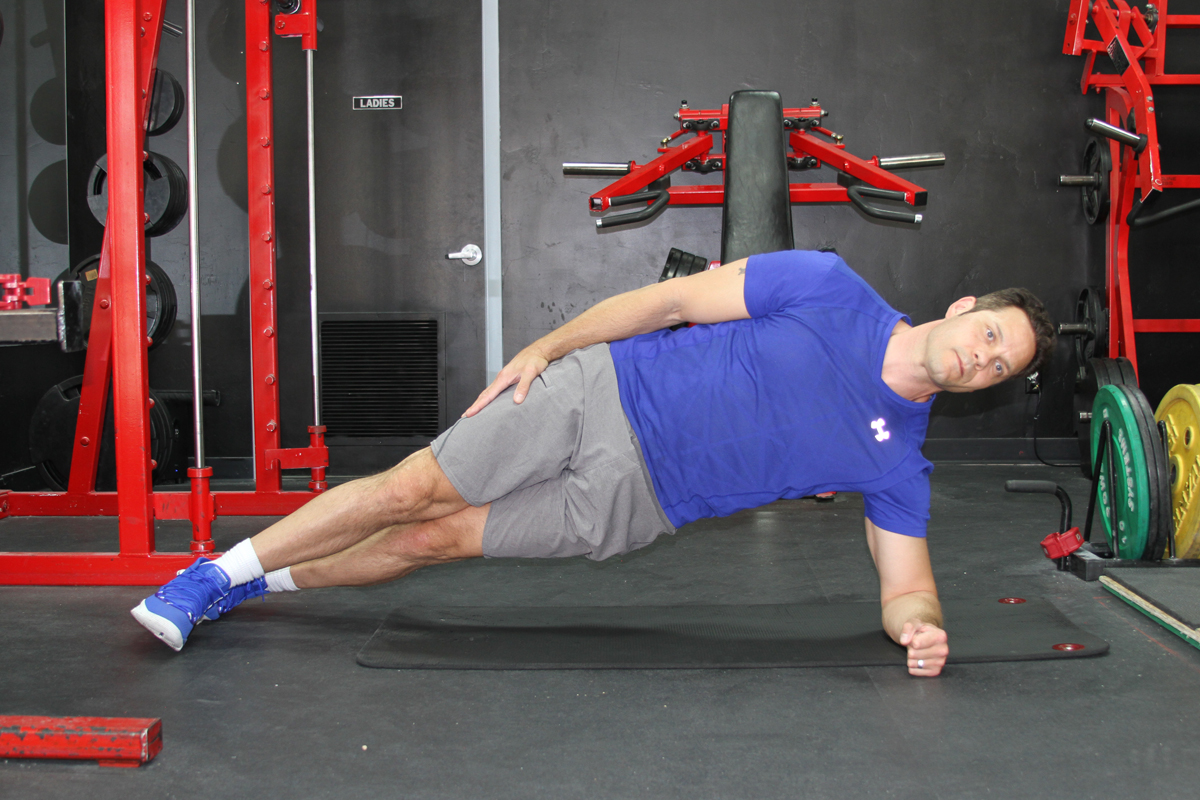
This is a gold-standard lateral stabilization move that will light up the core.
- Lie on side and place top leg over bottom leg (heel to toe).
- Position elbow at 90-degree angle to torso.
- Brace core with minimal-to-moderate abdominal contraction and elevate torso off floor, maintaining neutral spine.
- Hold for 10 seconds, rest and repeat 3 times, each side.
BIRD DOG

This tri-planar exercise adds a transverse-plane component to the sagittal-plane modified curl-up and the frontal-plane side plank. When done properly, bird dog is surprisingly difficult because it poses balance and postural challenges.
- Start in quadruped position.
- Reach one arm forward and opposing leg straight back.
- Align lead arm, head, hips and leg.
- Hold for 10 seconds then switch sides, performing 3 sets per side.
The Standing Big Three
Once clients are proficient with the ground-based big three, they can progress to “the standing big three” in anti-rotation.
PALLOF PRESS
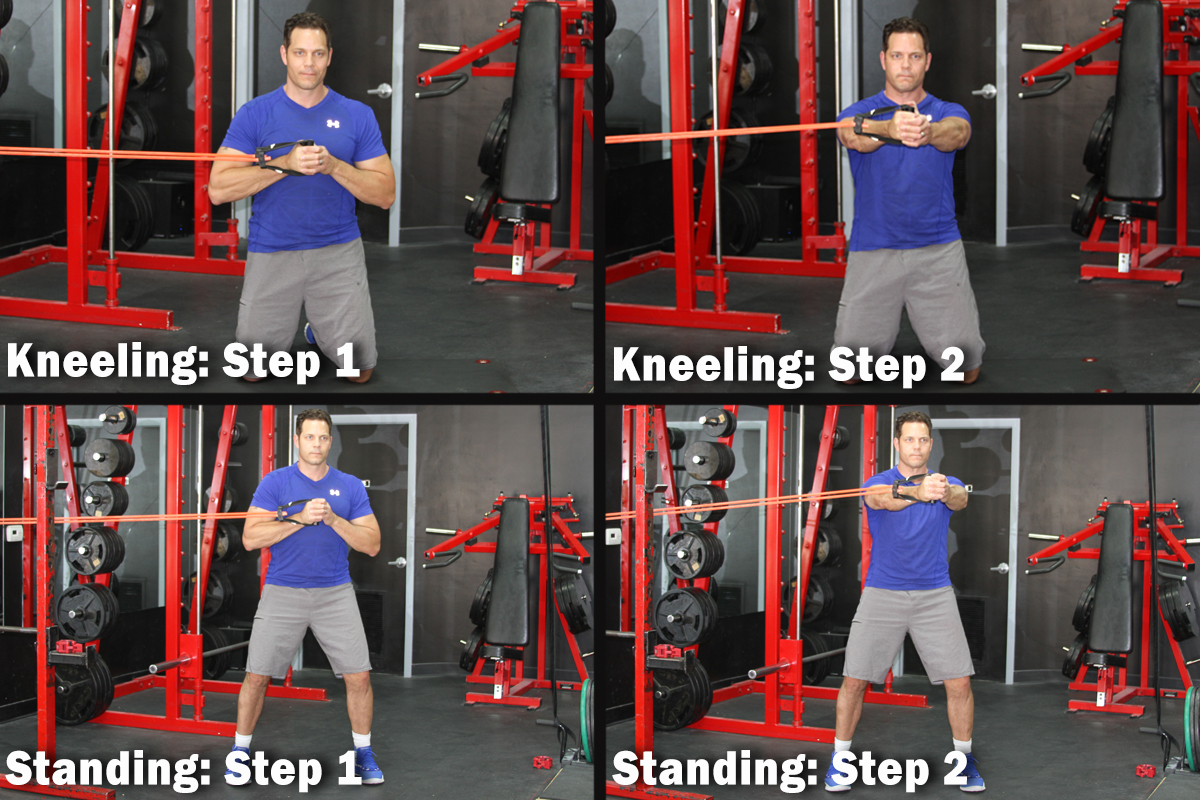
This kneeling or standing torsional buttressing task is named after the physical therapist John Pallof, who pioneered the move (Gentilcore 2018). The exercise is a great way to introduce transverse-plane loads that require a bracing core contraction with minimal movement of the upper extremities. The kneeling position takes the legs out of the movement and further challenges the core.
- Start in tall kneeling position, sideways to anchor point, both hands clasping resistance at sternum level.
- Maintain neutral spine and extend both hands directly from chest. (Trainer tip: It’s common for the lower back to arch; do not allow this to happen.)
- Pause at end range of each rep and hold for 3 seconds. (Trainer tip: Cue the client to feel the challenge of controlling anti-rotation through the torso and hips.)
- Perform 8–12 reps per side, 2–3 sets, based on fitness level and goals.
CYLINDER ROTATION

Once a client has built up strength and endurance and can proficiently do anti-rotation in the transverse plane with the Pallof press, you can introduce cylinder rotation, a move that also mobilizes the hips, ankles and feet. In this exercise, the client rotates through the hips while maintaining a neutral spine. The move is designed to “groove” hip rotation while limiting twisting in the lumbar spine, which “reduces the intrinsic strength of the disc annulus” (McGill 2007). Ideally, the torso rotates on top of the hips in the same way a cylinder rotates on a countertop: The top and bottom of the cylinder accelerate at the same speed and travel the same distance while the countertop remains stable.
A similar movement occurs as the shoulders, spine and pelvis accelerate at the same speed and travel the same distance on top of the hip joints. The rear-leg gluteus maximus fires hard to assist with external rotation as the front hip goes into internal rotation. Meanwhile, the rear foot goes into a pronated position, and the lead foot drives into supination.
- Start in athletic stance, facing slightly back toward anchor, both hands clasping resistance, arms extended off chest, elbows slightly bent.
- Make sure to brace core, then rotate shoulders, spine and pelvis—like a cylinder—away from anchor.
- Note that rotation and anti-rotation occur on longitudinal axis (imagine a string pulling head straight up toward ceiling). Pause at end range to check form.
- Ensure that cords do not touch torso (this signals overrotation).
- Perform 8–12 reps per side, 2–3 sets, based on fitness level and goals.
HORIZONTAL CHOP WITH LEAD-LEG STEP
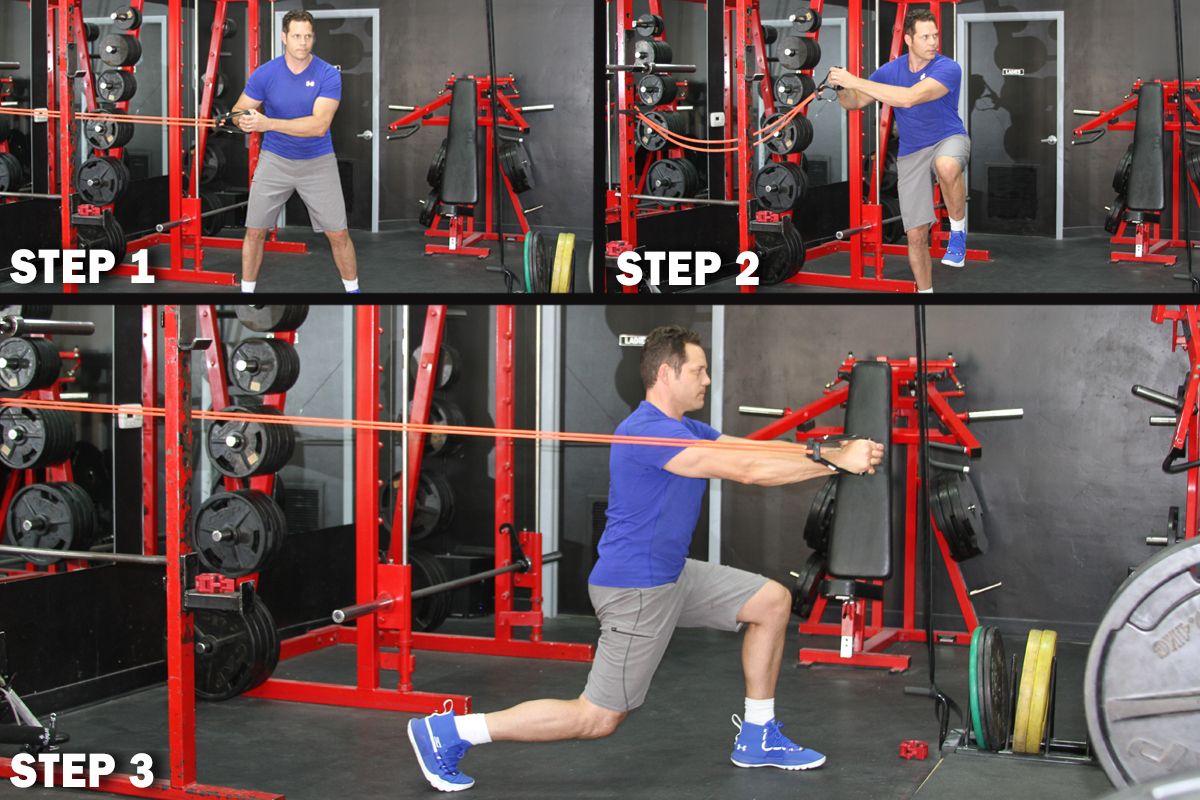
The client may feel slightly robotic at this point in the progression. However, once the anti-rotation basics have been mastered, it’s time to up the fun factor. The last move of this progression is more athletic and focuses on fluidity and power. If you’ve watched athletes throw, strike or serve, you know they don’t move like cylinders. There’s some disassociation between the shoulders and pelvis, which places a diagonal stretch on the oblique sling system. Witness this yourself by standing in front of a mirror wearing a loosely fitted shirt. Cock your throwing arm behind you as if preparing to throw overhead. Notice how the shirt wrinkles in a diagonal pattern, starting from your throwing shoulder to the opposite pelvis. The wrinkling demonstrates a stretching of the fabric—not dissimilar to what is happening to the muscles underneath. This “pre-stretch,” often referred to as the stretch-shortening cycle, stores potential kinetic energy so it can later be released explosively.
Athletes rely on the stretch-shortening concept to increase explosive power in all types of sports (Chu 2011). The anti-rotation pre-stretch also happens in many daily tasks, such as throwing luggage into the trunk of a car. Capitalize on this stretch-shortening cycle by adding a lead-leg step to the previous drill to perform the horizontal chop with lead-leg step.
- Start in narrow stance, side facing anchor, both hands clasping resistance with arms slightly flexed in ready position in front of sternum.
- Take lead-leg step while simultaneously driving arms back toward resistance anchor, creating pre-stretch and harnessing energy between shoulders and pelvis. Motion comes from hips and thoracic spine, not lumbar spine.
- Maintain minimal-to-moderate core-bracing contraction to help stabilize lumbar spine in neutral during both pre-stretch (eccentric) and chopping (concentric) phases. (Trainer tip: Use tactile feedback if needed. Simply tap on the client’s rectus abdominis to ensure there’s a light core contraction prior to the pre-stretch, or cue a diaphragmatic breath during the pre-stretch, which will increase intra-abdominal pressure. This helps stabilize the lumbar spine.)
- While pushing off ground with rear leg, chop horizontally with both hands. Pivoting off rear foot helps minimize knee stress while improving balance and alignment. (Trainer tip: If needed, have the client practice pivoting off the rear foot in isolation. Cue client to “squash a bug” or “extinguish a cigarette” by rotating 90 degrees on the ball of the rear foot. Unlike a golfer’s “soft pivot,” which occurs on the toes of the rear foot, this is a “hard pivot,” which maintains pressure through the ball of the rear foot.)
- Perform 8–12 reps, 2–3 sets.
Note: This move is designed to be a dynamic exercise performed at speed, yet it is imperative that the client start slowly, integrate the movement pattern and build explosiveness over time.
See also: Sample Class: Twisted!
References
Chu, D.A. 2011. Jumping Into Plyometrics. Champaign, IL: Human Kinetics.
Colston, M.A. 2012. Core stability, part 1: Overview of the concept. International Journal of Athletic Therapy & Training, 17 (1), 8–13.
Gentilcore, T. 2018. The ultimate Pallof press guide. Accessed June 7, 2019: bodybuilding.com/content/the-ultimate-pallof-press-guide.html.
Logan, G.A., & McKinney, W.C. 1970. Kinesiology. Dubuque, IA: William C. Brown.
McGill, S. 2007. Low Back Disorders: Evidence-Based Prevention and Rehabilitation. Champaign, IL: Human Kinetics.
McGill, S. 2010. Core training: Evidence translating to better performance and injury prevention. Strength and Conditioning Journal, 32 (3), 33–46.
Santana, J.C. 2000. Functional Training: Breaking the Bonds of Traditionalism (Companion Guide). Boca Raton, FL: Optimum Performance Systems.
Santana, J.C., McGill S.M., & Brown L.E. 2015. Anterior and posterior serape: The rotational core. Strength and Conditioning Journal, 37 (5), 8–11.
Santana, J.C., Vera-Garcia, F.J., & McGill, S.M. 2007. A kinetic and electromyographic comparison of standing cable press and bench press. The Journal of Strength & Conditioning Research, 21 (4), 1271–7.

Pete Holman, MSPT
Pete Holman, MSPT, is a physical therapist, certified strength & conditioning specialist and US National taekwondo champion and team captain. His passion for health and fitness has stimulated a successful adjunct career as an inventor. He produced several products, most notably the TRX® Rip Trainer and the Nautilus Glute Drive. Specializing in biomechanics, core performance and the aging athlete, Pete uses his experience as an elite level athlete and his unique knowledge of the human body, to bring out the athlete in us all. Pete is an active contributor to PTontheNet, IDEA Fitness Journal, STACK Magazine and IronMan Magazine.